Sometimes you have a Windows Store Application and you want the user to write a feedback using a form in your website. In this article we will create a Windows Store Application that implements the settings contract and create an entry in the settings flyout that opens your website feedback.
Create a Blank Windows Store App
- Open Visual Studio 2012 for Windows 8.
- Click on New Project. The New Project Dialog box appears.
- From the left pane select C# and then Windows Store Templates.
- From the right pane select Grid App Template.
- Type your project name and then click Ok. We set the project name to SettingsApp.

Create the UI and adding Code
- Open the MainPage.xaml.cs file by double clicking the MainPage.xaml file from the Solution Explorer.
- Select the XAML view and find the Grid Control in the MainPage.xaml.
- Add the following namespaces to the start of the MainPage.xaml.cs file.
using Windows.UI.ApplicationSettings;
- Find the MainPage Constructor method and add the following code to it after the call to InitializeComponent method:
public MainPage()
{
    this.InitializeComponent();
    SettingsPane.GetForCurrentView().CommandsRequested += MainPage_CommandsRequested;
}
In the above code:
- The above code simply add a handler to the CommandsRequested Event. The CommandsRequested event occurs when the user opens the settings pane. Listening for this event lets the app initialize the setting commands and pause its UI until the user closes the pane.
- During this event, we will append our SettingsCommand objects to the available ApplicationCommands vector to make them available to the SettingsPane UI.
After the MainPage Constructor method add the following code that will run when the CommandsRequested event fires.
private void MainPage_CommandsRequested(SettingsPane sender, SettingsPaneCommandsRequestedEventArgs args)
{
    SettingsCommand feedbackCommand = new SettingsCommand("Feedback", "Feedback (web)", async (x) =>
    {
        Uri feedbackUri = new Uri("http://www.ultradevelopers.net/en-us/services", UriKind.Absolute);
        await Launcher.LaunchUriAsync(feedbackUri);
    });

    args.Request.ApplicationCommands.Clear();
    args.Request.ApplicationCommands.Add(feedbackCommand);
}
- In the above code:
- In the above code we simply create an object of the SettingsCommand class. The SettingsCommand creates a settings command object that represents a settings entry. This settings command can be appended to the ApplicationCommands vector.
- We set the SettingsCommand object Id to Feedback.
- Set the SettingsCommand Text to feed (web). It is recommended from the UX to indicate that the user will open a web page. If going directly to the web instead of a Flyout, let the user know with a visual clue, for example, "Help (online)" or "Web forums" styled as a hyperlink.
- Add a handler for the event that is raised when the user selects the command.
- In the command handler we create an object from the Uri class. The Uri class parses Uniform Resource Identifiers (URIs). Pass your Feedback page url to the Uri constructor and the type of that url. We set it as absolute.
- Then we call the Launcher.LaunchUriAsync async method. The Launcher class starts the default app associated with the specified file or URI.
- As we will open a web page so we use the LaunchUriAsync method and pass to it the Uri we have created.
- You have to use the await operator with any async methods. And mark the settingsCommand handler as async using the async keyword.
- Then we clear the ApplicationCommands vector and add our feedback Settings Command.
- Build your project and run the project in Simulator.
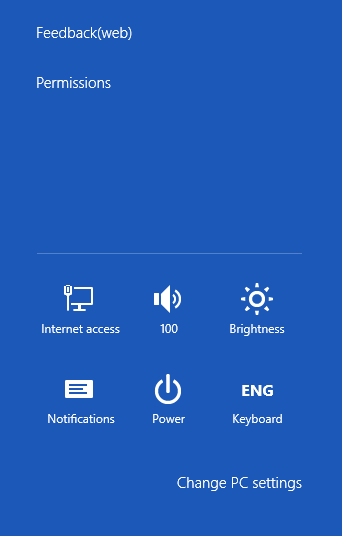
- Open the Settings charm. You will find two commands. The feedback command and a system added command for Permission.

- Click on the Feedback (web) settings command this will launch your default browser with your website feedback page.
Now you have a Windows Store Application that implements the settings contract and create an entry in the settings flyout that opens your website feedback.